Compatibility
Our Players are Compatible only with 64 bit systems of Windows 10 and Up and macOS High Sierra and up (Intel & Native Apple Silicon).
We’ve tested Tribe Player 2 in the latest versions of several DAW’s like Logic Pro X, Reaper, Cubase, Nuendo, Ableton Live, FL Studio, Studio One, Pro tools & Digital Performer, however it’s difficult to keep track on older versions of these DAW’s so try to keep your system updated to fully compatibility with our products
Installation
You can install the Tribe Player Software by downloading the Tribe Universe installer, this installer will install all the software you need to use our sound libraries, this includes the Tribe Player and Engines for your DAW and the Tribe Manager Application for Sound Libraries installation. You can download the Tribe Universe installer from your Account Page.
Installing Libraries
For Sound Libraries Installation please watch this article: Sound Libraries installation with Tribe Manager APP.
Configuration
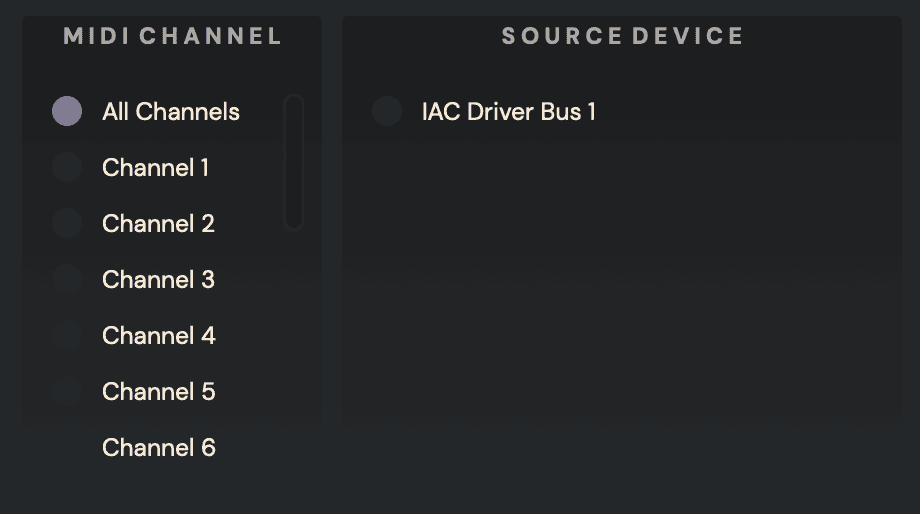
MIDI Settings
In the Configuration Tab (The Gear Icon Button) you’ll find the MIDI Channel setup where you can select the receiving MIDI channel of the Tribe Player, you can select a specific channel or by default select “All Channels” to receive data from any MIDI channel from the DAW or controller.

Use Open GL
If you have an Open GL graphic card compatible you can render the GUI of the Tribe Player using the Open GL graphics library, this will reduce some of the CPU processing and loading it to the GPU. Just set “Yes” from the drop menu and re open the Plugin window.
*If you don’t have a compatible Open GL graphic card this could be problematic with your system.
Streaming Mode
You can select a “Fast – SSD” Streaming mode if you have installed the samples in a SSD Storage drive, this will increase the speed of the audio streaming engine, if you are using our libraries in a HDD Storage drive select “Slow – HDD” to optimize the speed and prevent clicks and pops.
Max Voices
Some of our multi microphone instruments can play a lot of voices (samples played simultaneously) if you are experiencing high CPU loads or clicks and pops you can limit the Max Voices the Tribe Player can play but keep in mind that the this will Kill some of the sounds.

Pre load Buffer
This represents the minimum quantity of sample data preloaded into memory for every Sample. Increasing this setting will bring in extra samples to the RAM, leading to a reduction in CPU workload. This proves especially advantageous when you’re using slower hard drives (such as spinning disks). Keep in mind that setting this value too high may result in excessive RAM usage, which can be observed in the bottom right corner of the interface.
Buffer Size
This parameter defines the quantity of sample data stored in memory for each audio recording stream simultaneously. Something like the Preload Buffer Size, raising this value will load extra samples into memory, effectively easing the CPU usage.
Sampler Voices
This represents the upper limit of voices that can be simultaneously played. Increasing this limit will result in higher CPU usage. However, setting the voice limit too low may lead to “voice stealing,” where new notes cut off samples from other notes. It is generally advisable to keep this setting at its default value. If you need to decrease CPU usage, we recommend lowering it to no less than 64.
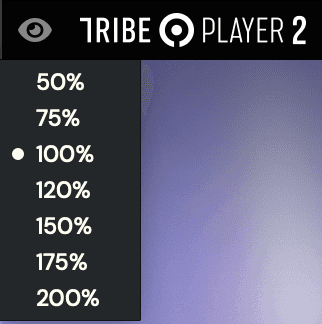
Zoom
You can select adjust the Zoom of the Tribe Player’s window by clicking in the “Eye” icon in the upper left and selecting the Zoom factor or by dragging the lower right corner of the window, this Zoom setting will be remembered in all the hosts where you open the Tribe Player.
Layout
There are some sections in Tribe Player that allow you to navigate its functions. These are the top bar or header, the main section, the sidebar, the macro controls section, and the bottom bar (footer).
Header
The first section is the main header bar, where you can find general controls such as navigation of the main section, preset name display, configuration window, the Kill All button that kills all incoming MIDI messages (useful when a note or MIDI message gets stuck), the main volume control, balance, Global BPM and overall tuning frequency (from 220 to 880hz).
Main Section
In the main section you’ll find some of the main controls of the Tribe Player 2 such as the main performance view where you’ll see the instrument image and some general controls, the Preset Browser, the Effect Controls, Advanced Options, Synthesiser, MIDI Player, Main Effects and the Configuration.
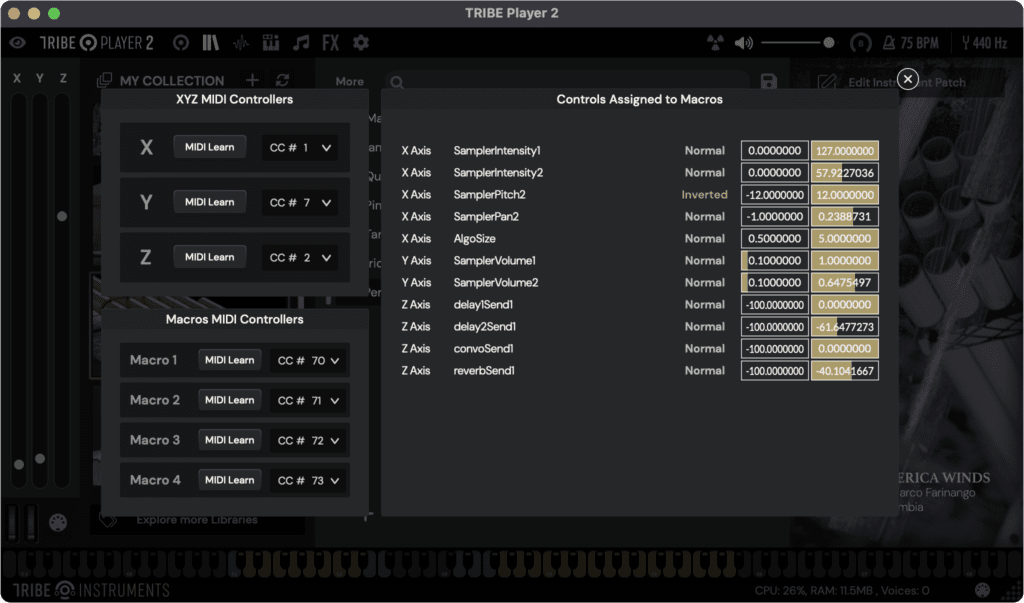
XYZ Tridimensional Controller
You can assign almost any parameter of the Player to three different Axes and control the Range and Polarity of each one to create amazing and dynamic Performances.
Just Right Click on a Parameter and assign it to one of the Axes and click the “MIDI Din5” Button to edit the Ranges and invert the control polarity of each assigned Parameter.
You can Control these Axes with your MIDI Controller through MIDI CC Messages, manually select the MIDI CC number or Click MIDI Learn and move the controller to automatically assign it.
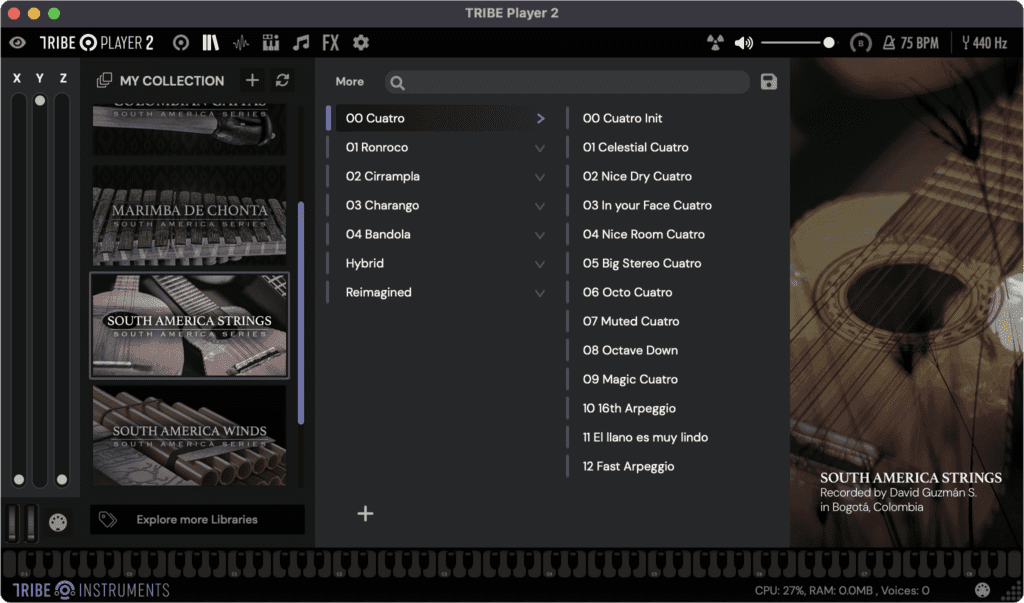
Preset Browser
This view is where you can load an instrument, just select the library, then select a bank and then load a preset. You’ll notice that the interface changes depending on the instrument you loaded. Generally, the initial presets are ideal for starting with natural and realistic sounds and are perfect for modifying your sounds from scratch. You’ll also find hybrid presets that are ideal for soundscapes and heavily modified ethereal sounds.
You can also create your own banks and presets by clicking in the Plus “+” icon below the presets list, you can even Show, Copy, Import and Export these presets from the “More” menu.
Add your favourite presets clicking on the “Star” Button to the left of each preset name, then find them Clicking on the Favourite Star button in the upper right corner of the browser.
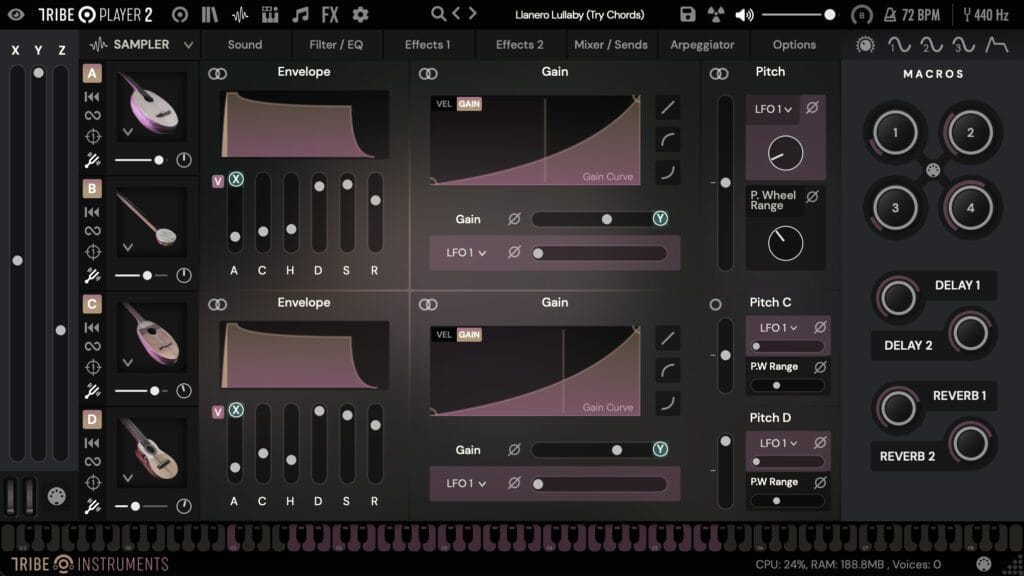
Sampler Layer Options
In this section you can have full detailed control over essential parameters such as the Envelope, Velocity & Gain Curve, Pitch, Filters, EQ, Effects, Microphone Levels, FX Sends and General options

Sampler Articulation Selector
In this section you can select four different Articulations and control some options like General Volume, Pan, Reverse Playing, Loop Enable, One-Shot mode and Pitch track.
You can control them independently or in two pairs and link/unlink some parameters like Envelope, Velocity, Gain, Pitch and Filter, the rest like EQ, effects and Microphone mixer applies for two pairs (A/B and C/D).
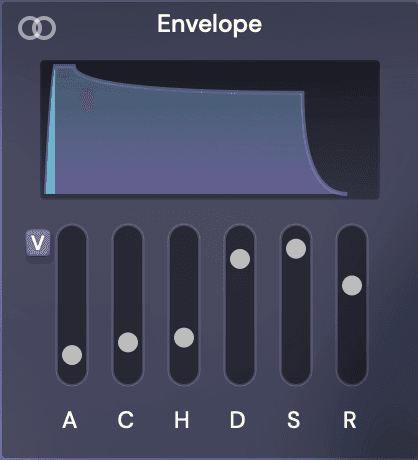
Envelope Modulator
You can control more parameters than a common Envelope, like Attack, Attack Curve, Hold, Decay, Sustain and Release.
You can visualise the graph of the envelope, link or unlink it to use it in two pairs and apply a velocity dependent attack time with the “V” Button, this will create dynamic attack times that soften the attack in low velocity performance to create more realistic sounds. (Less velocity longer attack times).
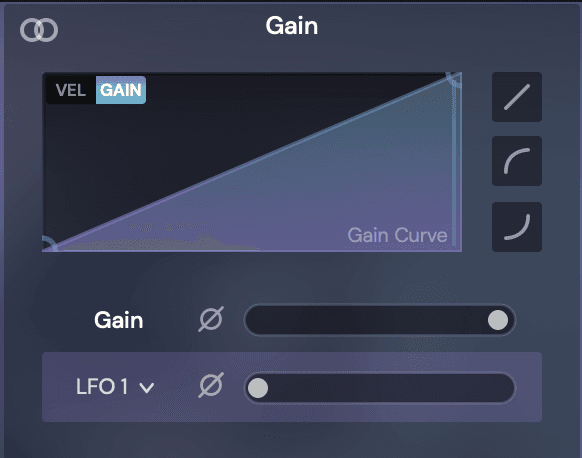
Gain Modulator
Control the Gain of each Sampler or Link it to control two pairs.
Here you can control the Gain level, invert its polarity and modulate it with three different LFO’s (You can invert the modulation polarity too) to create amazing tremolo effects.
You can also control the Gain curve with a table with predefined curves like Constant, positive Exponential and negative Exponential.
You can control the Velocity Curve from here clicking in the “VEL” Button.
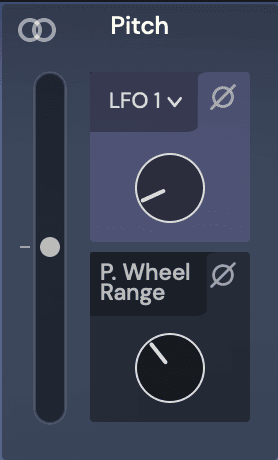
Pitch Modulator
Control the Pitch of each Sampler or Link it to control two pairs.
Here you can control the overall Pitch in Semitones and modulate it with three LFO’s and two envelope modulators, you can invert this modulation polarity.
You can control the range of your Pitch wheel controller in Cents too.
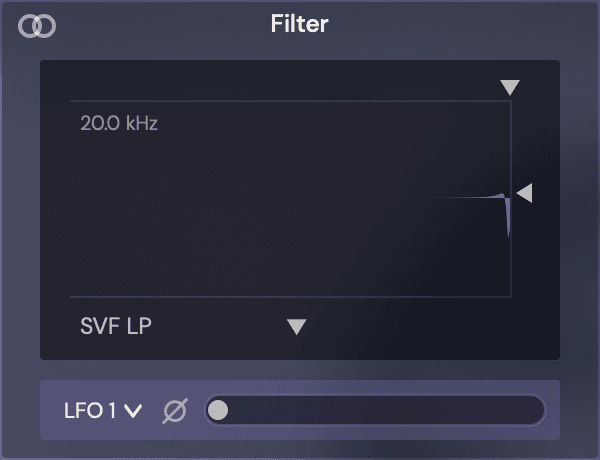
Filter
You can filter each Sampler or Link it in two pairs.
Use different filter types like, SVF HP, SVP LP, SVF Notch, 4 Ladder LP, Biquad LP, One Pole LP, One Pole HP, Moog LP (No modulation on this one) and Ring Mod.
Control the Filter frequency and Q and modulate the Filter Frequency with Three LFO’s and two Envelope modulators (The Envelope modulation applies only for individual unlinked Filters).
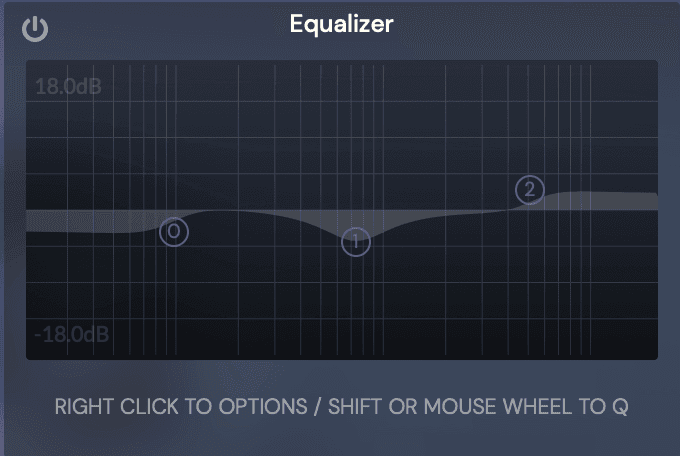
Equalizer
Each pair of Samplers have a Fully multi band Parametric EQ, Left Click to create a band and Shift Click or Mouse wheel to control its Q.
Right Click each band to select different filter types like Low Pass, High Pass, Low Shelf, High Shelf and Peak, you can delete or bypass the band from here.
Right Click outside a band to Delete All bands or activate a Spectrum analyser (this one will use some extra DSP).
DSP
Each pair of Samplers have a Fully multi band Parametric EQ, Left Click to create a band and Shift Click or Mouse wheel to control its Q.
Right Click each band to select different filter types like Low Pass, High Pass, Low Shelf, High Shelf and Peak, you can delete or bypass the band from here.
Right Click outside a band to Delete All bands or activate a Spectrum analyser (this one will use some extra DSP).
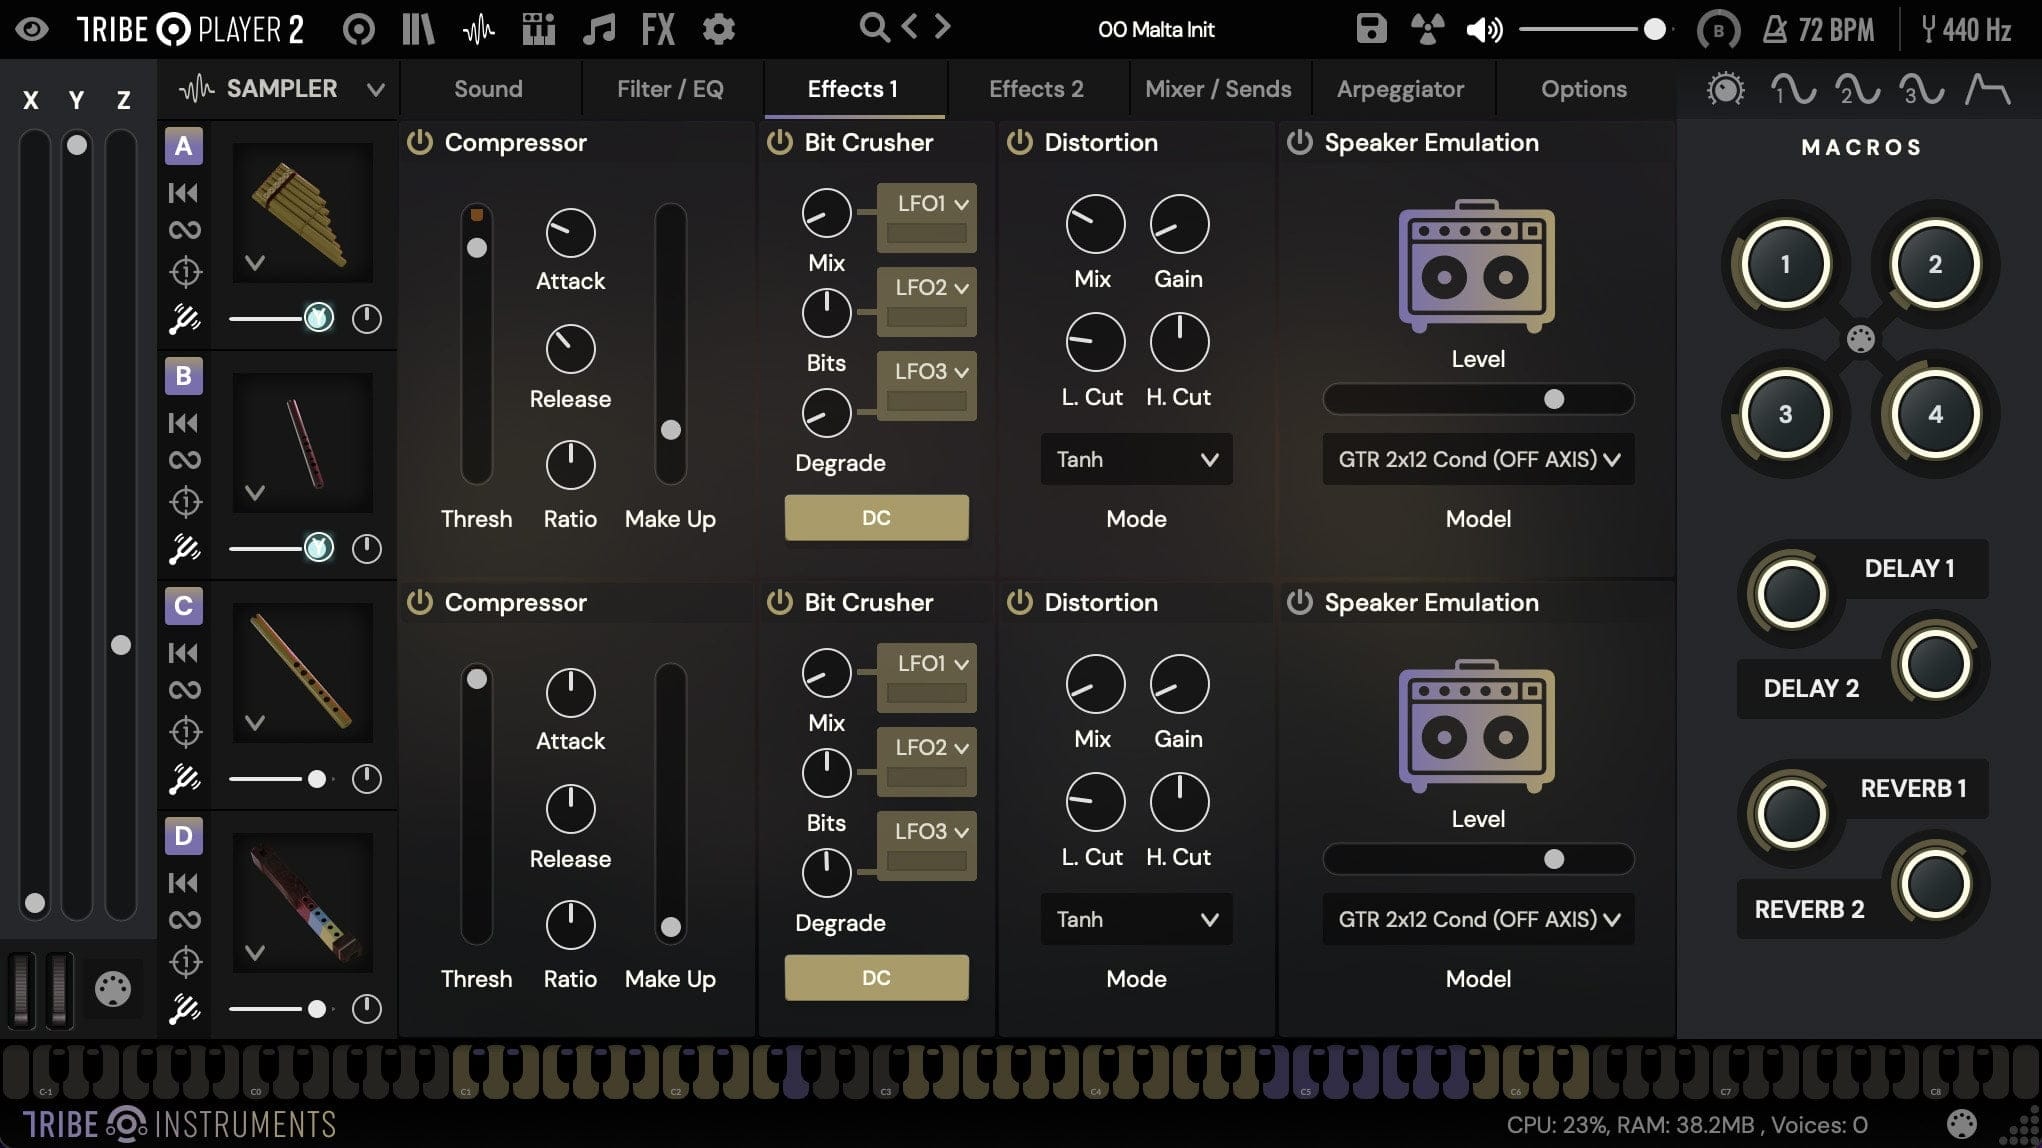
Compressor
This a very transparent compressor with basic functionality such as Attack, Release, Ratio, Threshold and Make up controls.
Bit Crusher
A bit Crusher with Wet/Dry Mix and Bit reduction distortion, you can degrade the signal too and set the Direct Current mode, you can also modulate these parameters with the Player LFO’s
Distortion
This is a Parallel distortion using different waveshaping algorithms where you can control the Mix, Gain and filter the distorted signal with a Low and High cut filters.
Phaser
A Simple Phaser effect with Speed, Feedback and Frequency Range Controls from 500Hz to 10Khz.
Chorus
This is a High quality Stereo Chorus based on the Dimension D unit that spread the width of the stereo image in a unique way with additional Depth and Delay controls (The Delay control can cause some artifacts when you are updating the value, not recommended to be modulated), you can modulate the Mix parameter with the Player’s LFO’s
Tremolo
We implemented a non MIDI synchronized Tremolo effect with variable wave shapes like Sine, Triangle, Saw and Square waves, you can control the DAW Sync/Free Speed, Smooth and Phase parameters and a Pre/Post FX chain.
Speaker Emulation
You can use different IR’s to emulate multiple Speaker models and mic positions.
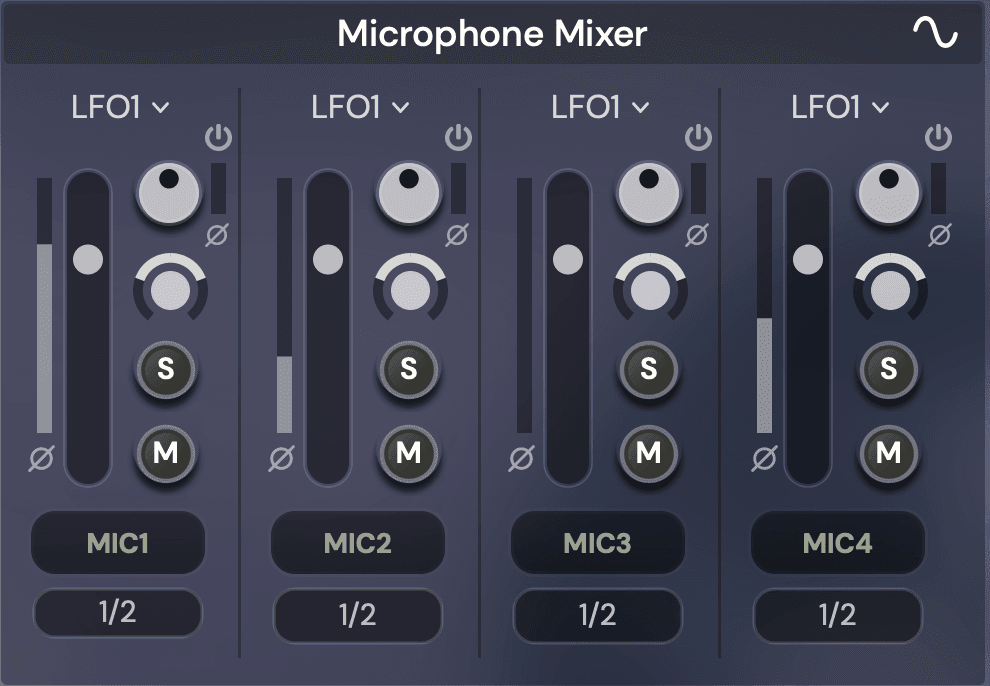
Microphone Mixer
Our libraries have been created and recorded with different types of microphones and techniques to provide many more combinations for your sound palette. Here you will find controls for panning, the main volume of each microphone, as well as stereo imaging or the width of each microphone, you can also modulate them using an LFO, it is important to note that to modulate panning, it must be at least on one side.
We can also route each of these microphones to different outputs in our DAW to modify them independently. Keep in mind that to do this, you will need to use the plugin in Multioutput mode in some DAWs.
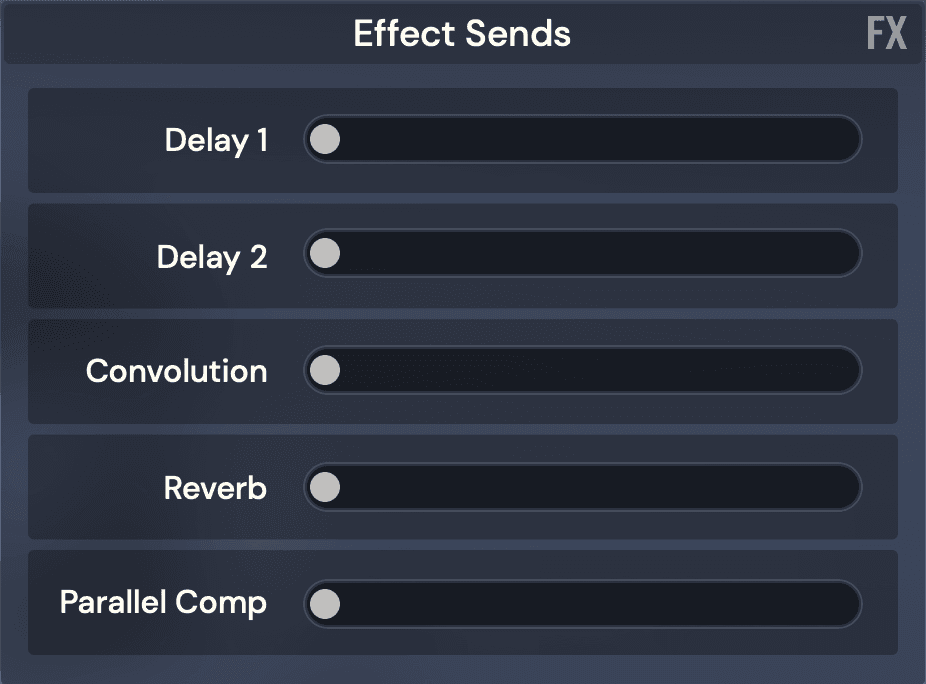
Sends Mixer
You can send the signal of each pair of samplers to five different parallel effects like two advanced Stereo Delays, a Convolution Reverb, an Advanced Reverb and a Parallel Compressor.
You can quickly access these Master Effects from here with the “FX” Button, keep in mind that these Master effects are global.
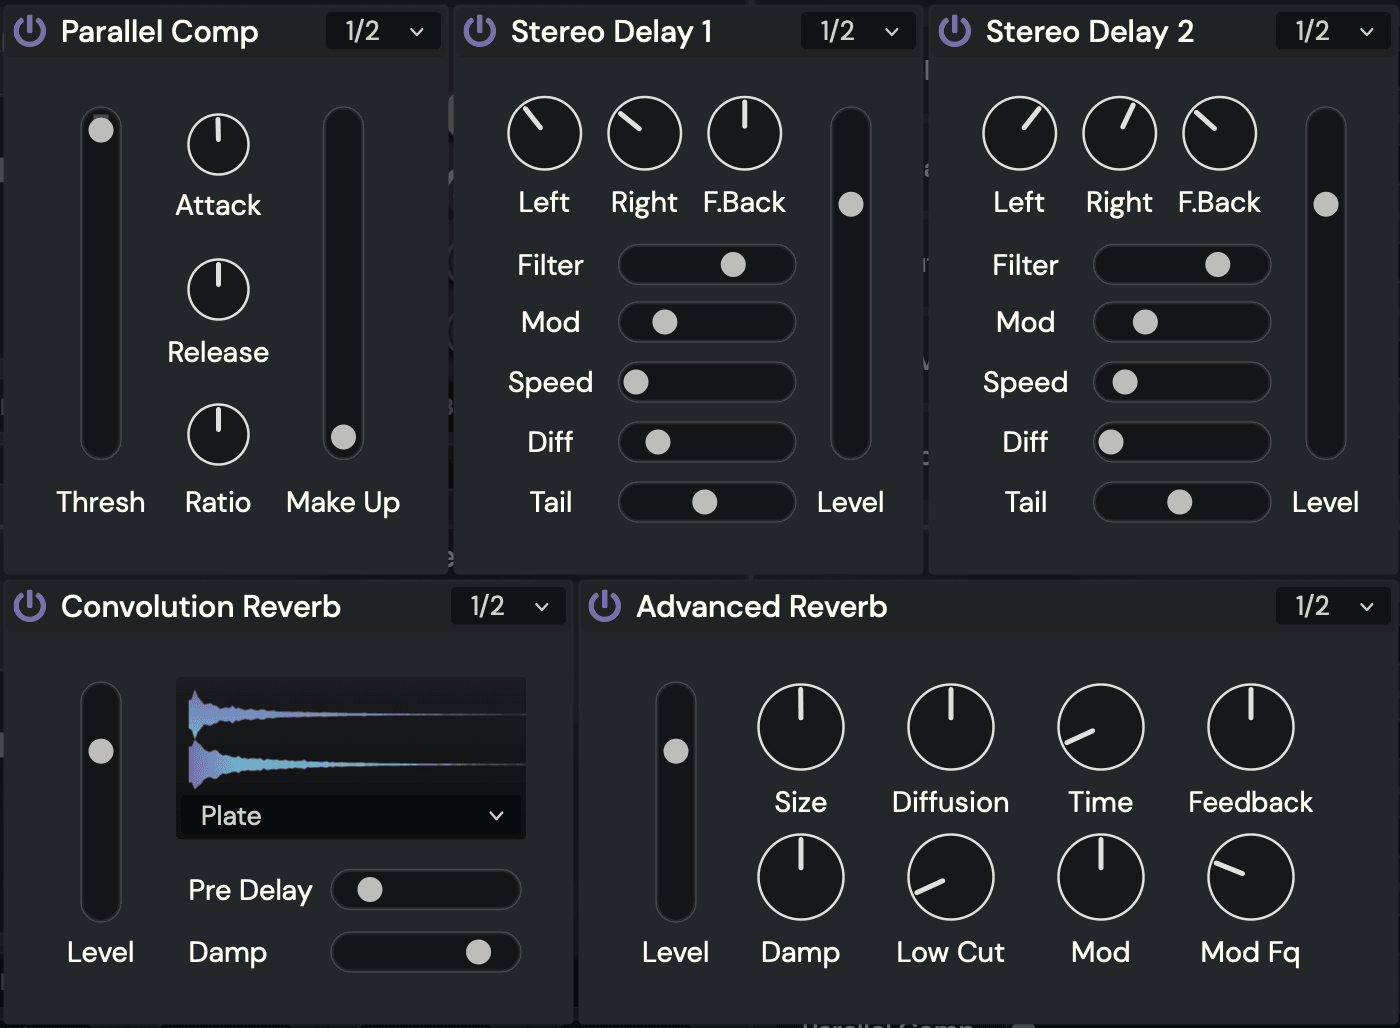
Global Master Effects
The Tribe Player 2 have five different Global Effects that receives signal from multiple sources in the player like the Samplers, the Drummer and the Synthesiser.
It features a Parallel Compressor, a dual Stereo Delays with Filter, Modulation and Diffusion controls, a Convolution Reverb with multiple IR types (with the possibility of adding your own impulses) and an advanced Reverb with advanced Modulation features to create amazing Lush effects.
You can Route these effects to the different 32 multi output channels of the Plugin.
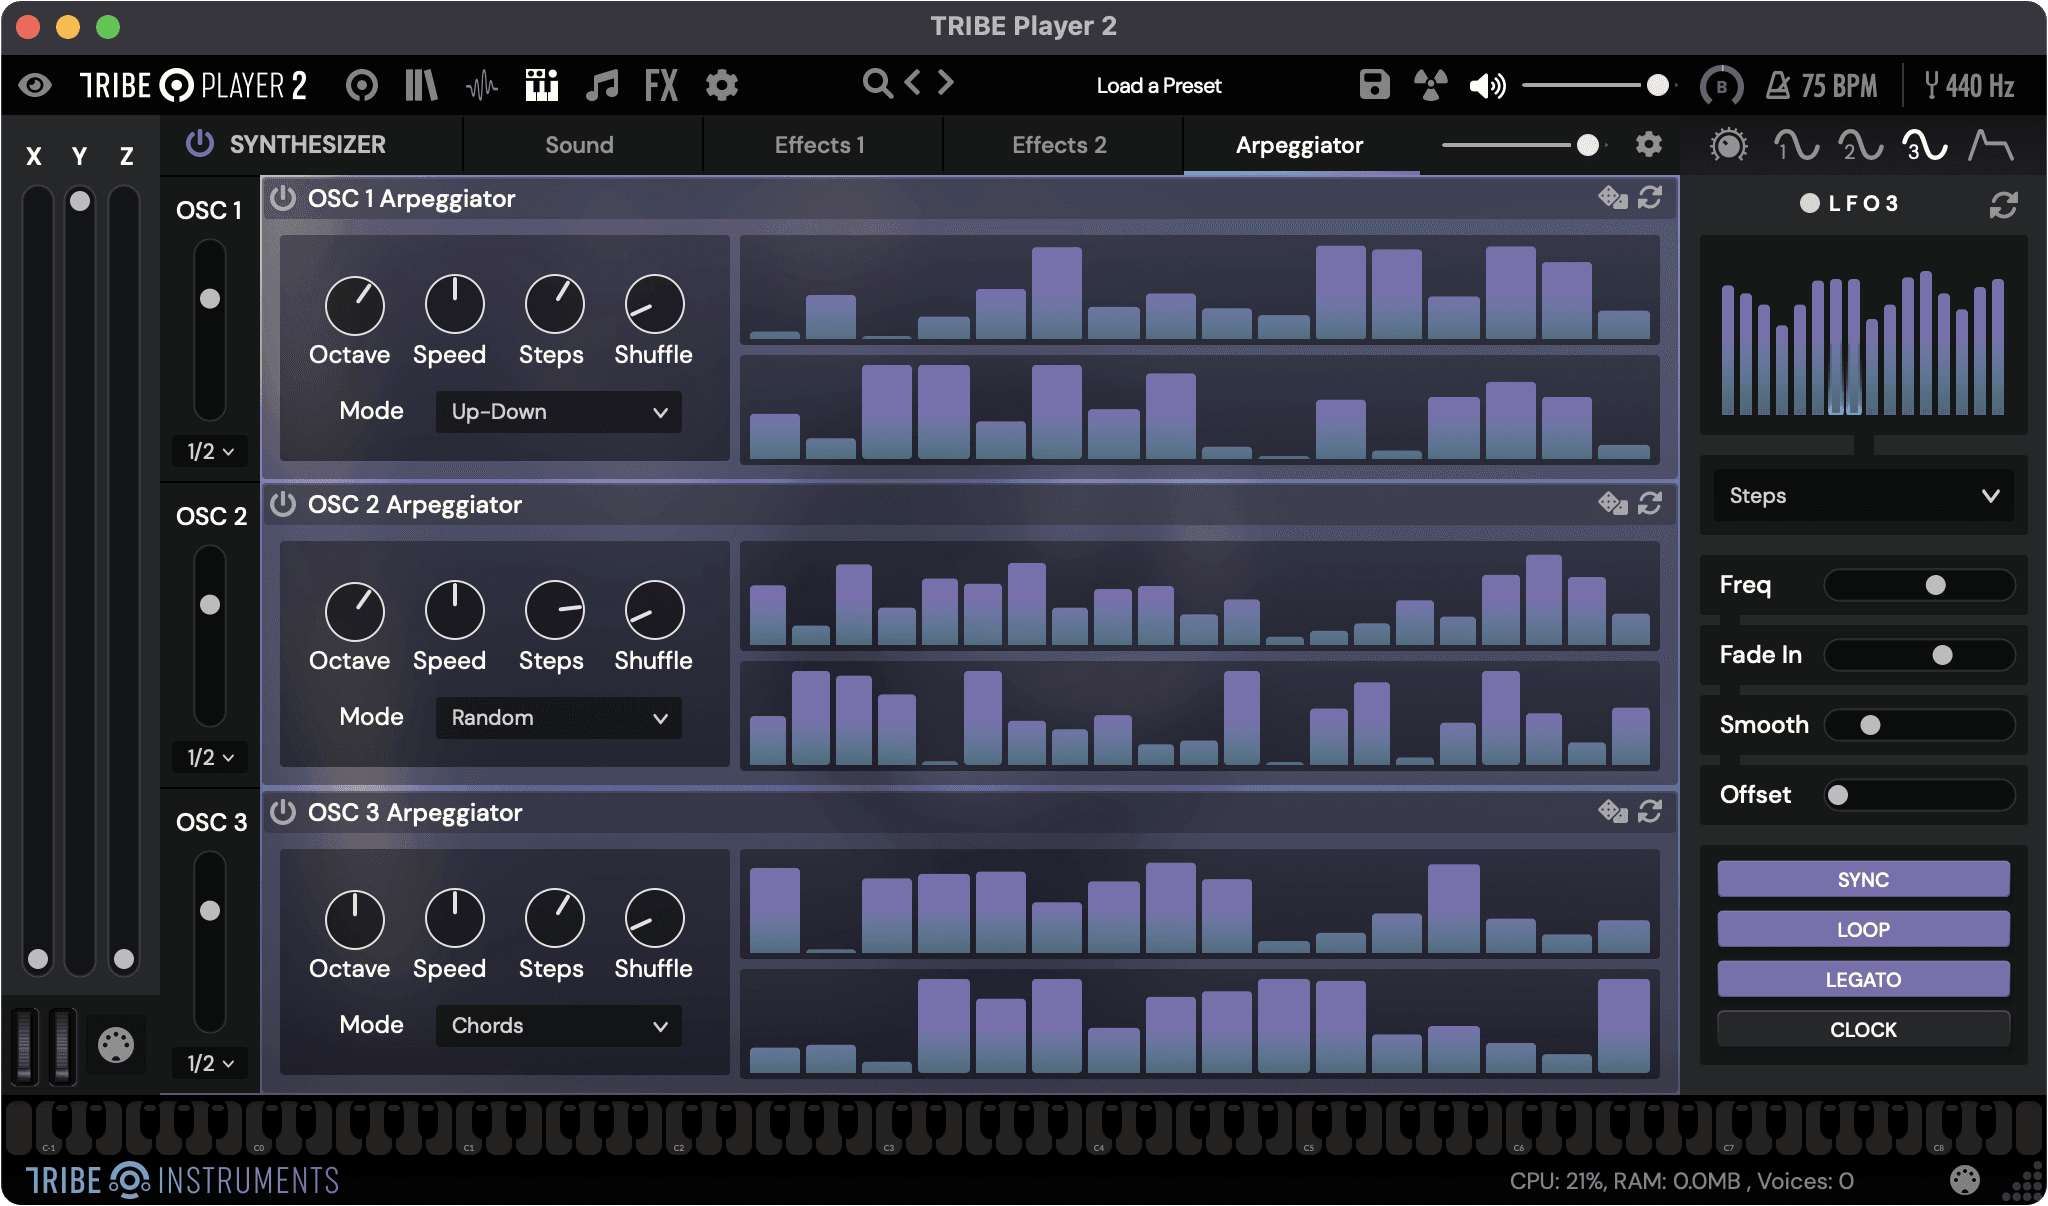
Arpeggiator
The Tribe Player also features a versatile Arpeggiator with various playback modes, including a “Chords” mode. This mode allows us to create different chord patterns. We can modify the intensity of each note, adjust the duration and even change the relative value of each note by up to two octaves.
We can also change the number of steps if we want a much longer or shorter arpeggio, adjust the speed and octave, and utilize the Step Reset and Stride controls to add more randomness to the patterns. Additionally, we can choose a random value if we want to leave it up to chance or simply reset it to start from scratch.
The best part of this arpeggiator is that we can also use it separately in each of the samplers. Simply click on this button and we can unlink it to assign a different arpeggiator to each of the samplers, thus creating much more complex sounds.
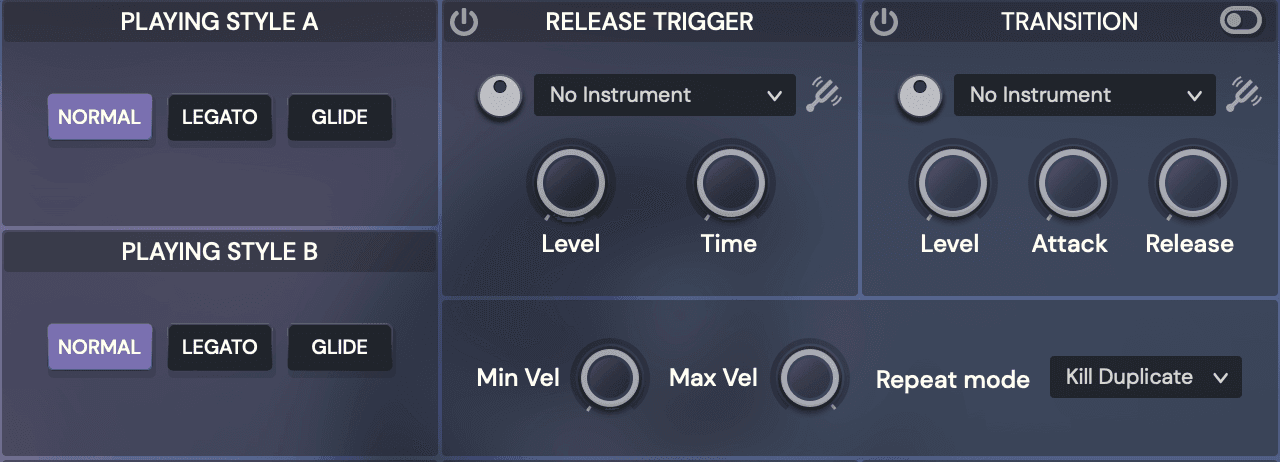
Samplers Options
You can modify different options for each pair of Samplers like the Playing Styles, Release Triggers, Transition/True Legato Samples, Min Max Velocity and the Repeat Mode.
Playing Styles
In this “Playing Styles” section, we can modify how the samples in the library are played. In Normal mode, we can create chords and play the instrument in a normal manner. We also have a Legato mode with retrigger, this cuts off the previous note and triggers it again when released. This allows us to create different articulations such as tremolos and glissandos.
We also have Glide, which creates a false legato effect using a pitch curve between notes. We can adjust the timing of this curve to achieve glide effects.
Release Trigger
In some Libraries you can add some Release Samples with the Release Trigger, control the Level, Pan, the attack time and Pitch-track for this sounds.
Transition/True Legato
In some Libraries you can control and assign true Legato and Transition Samples that will sound between two legato notes you can control the Level, Pan, Attack and Release Times and Pitch-tracking.
Min-Max Velocity
You can control the minimum and maximum velocity of each pair of Samplers. This helps us control the dynamics of the performance and achieve highly dynamic sounds.
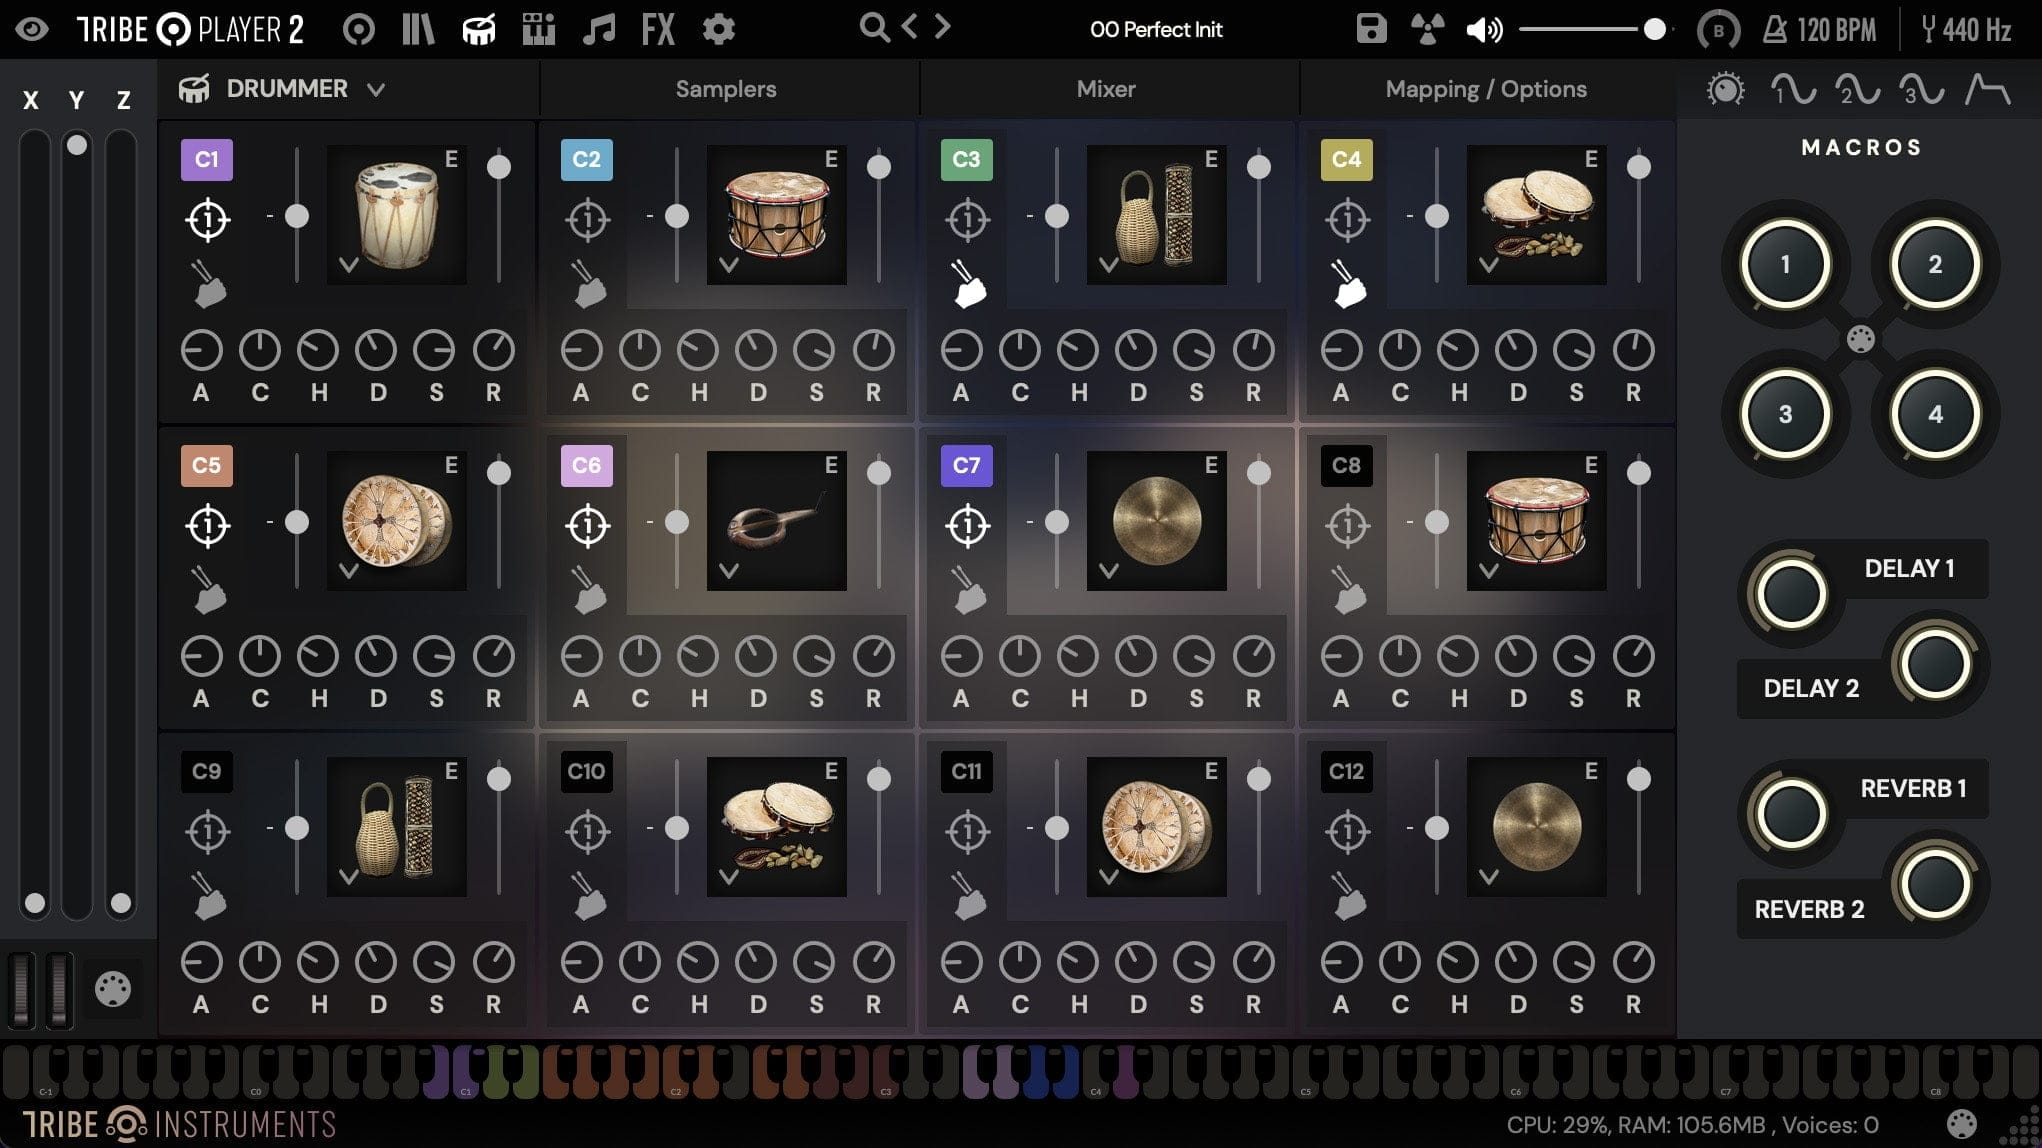
Drummer
You can now use certain instruments like in a Drummer machine environment with 12 different samplers with playing options and a dedicated mixer with Overhead and Room Controls with Percussion oriented DSP.
From here you can assign any included instrument to any Sampler channel and control the Level, Pitch, envelope, One-Shot and a “Humanise” Button that adds pitch and level variety to your sounds.
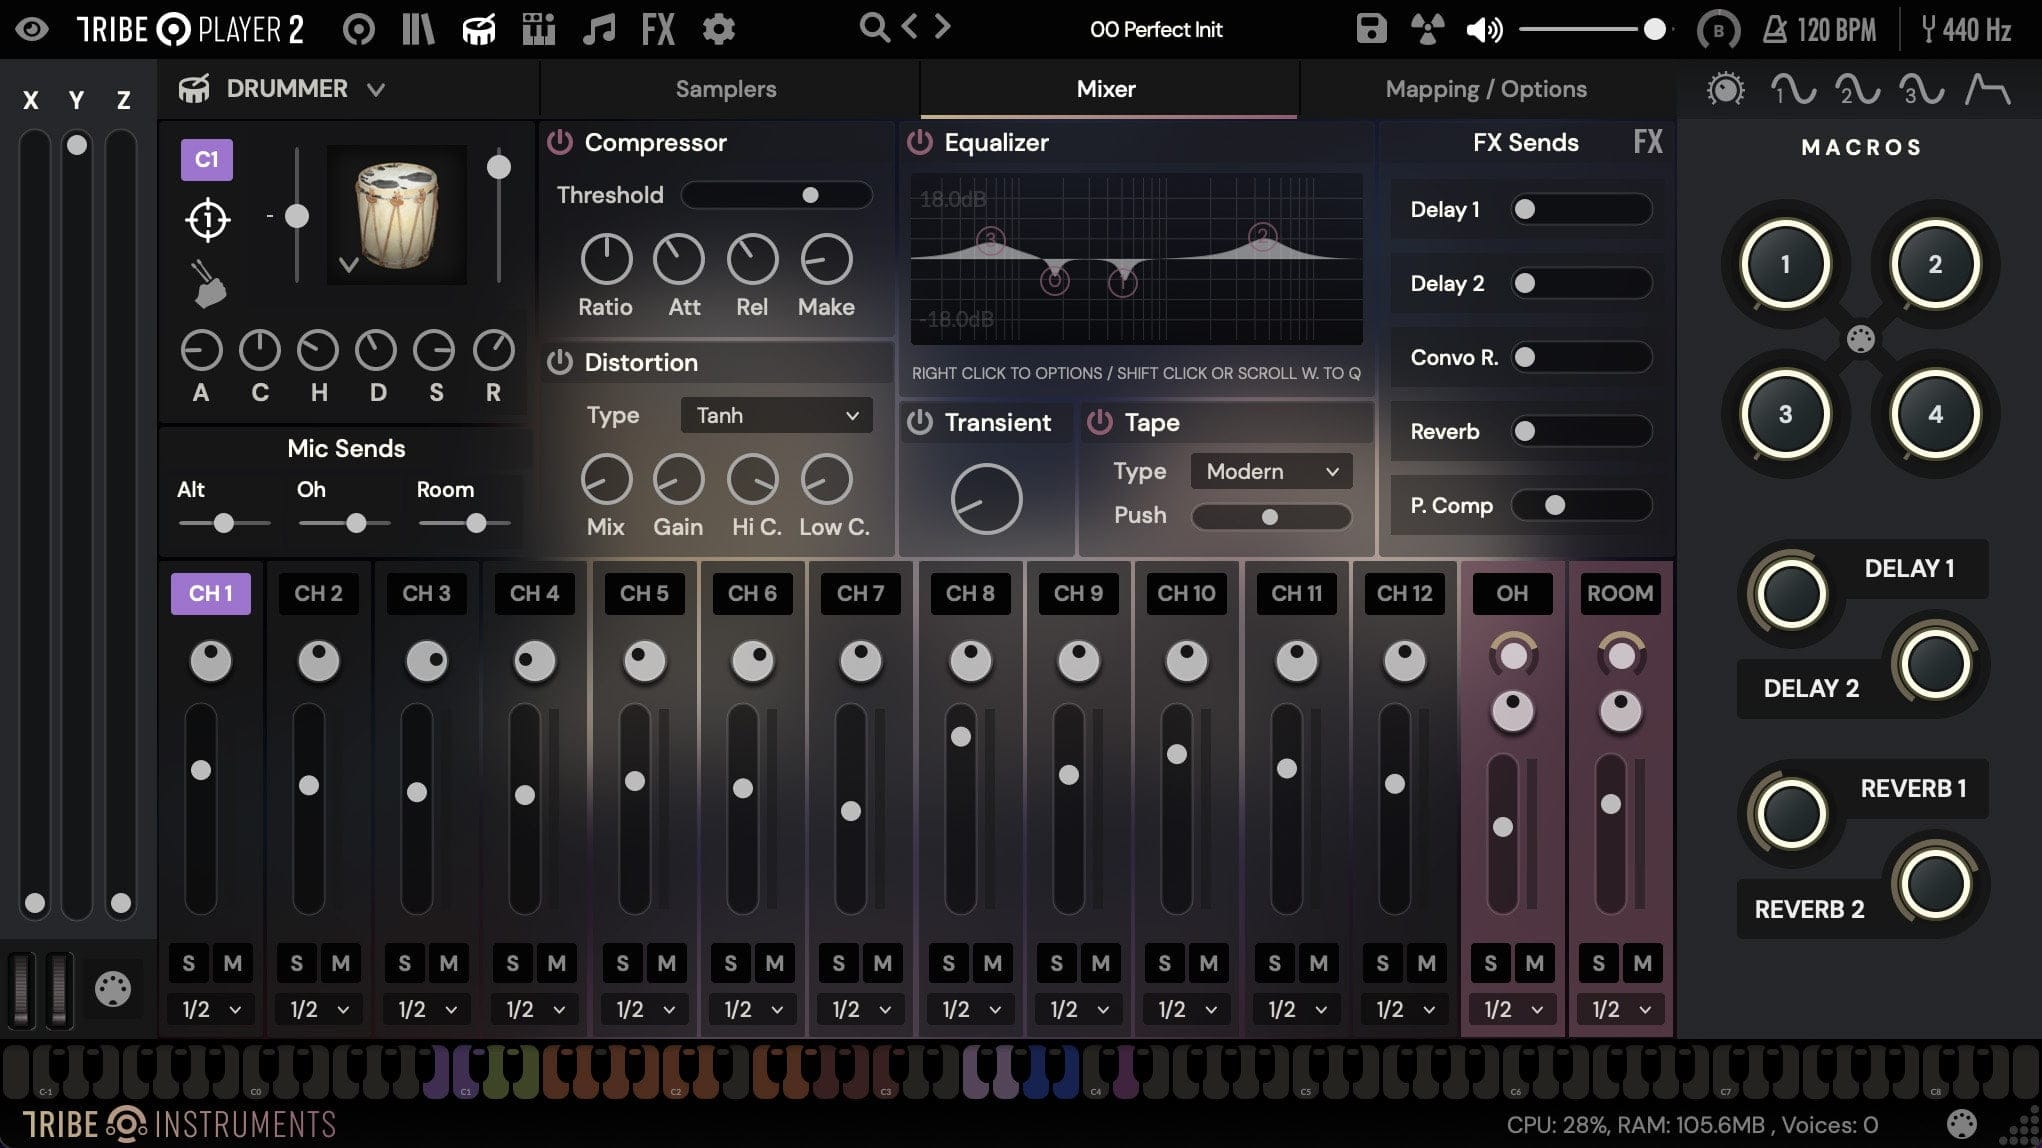
Drummer Mixer
Control the Level, Pan and width of each Sampler Channel with Overhead alt and Room Sends.
Process different types of DSP designed for Percussion like Compressor, Distortion, Parametric EQ, Transient Shaper and Tape Emulation and Send each channel to the Global Master Effects.
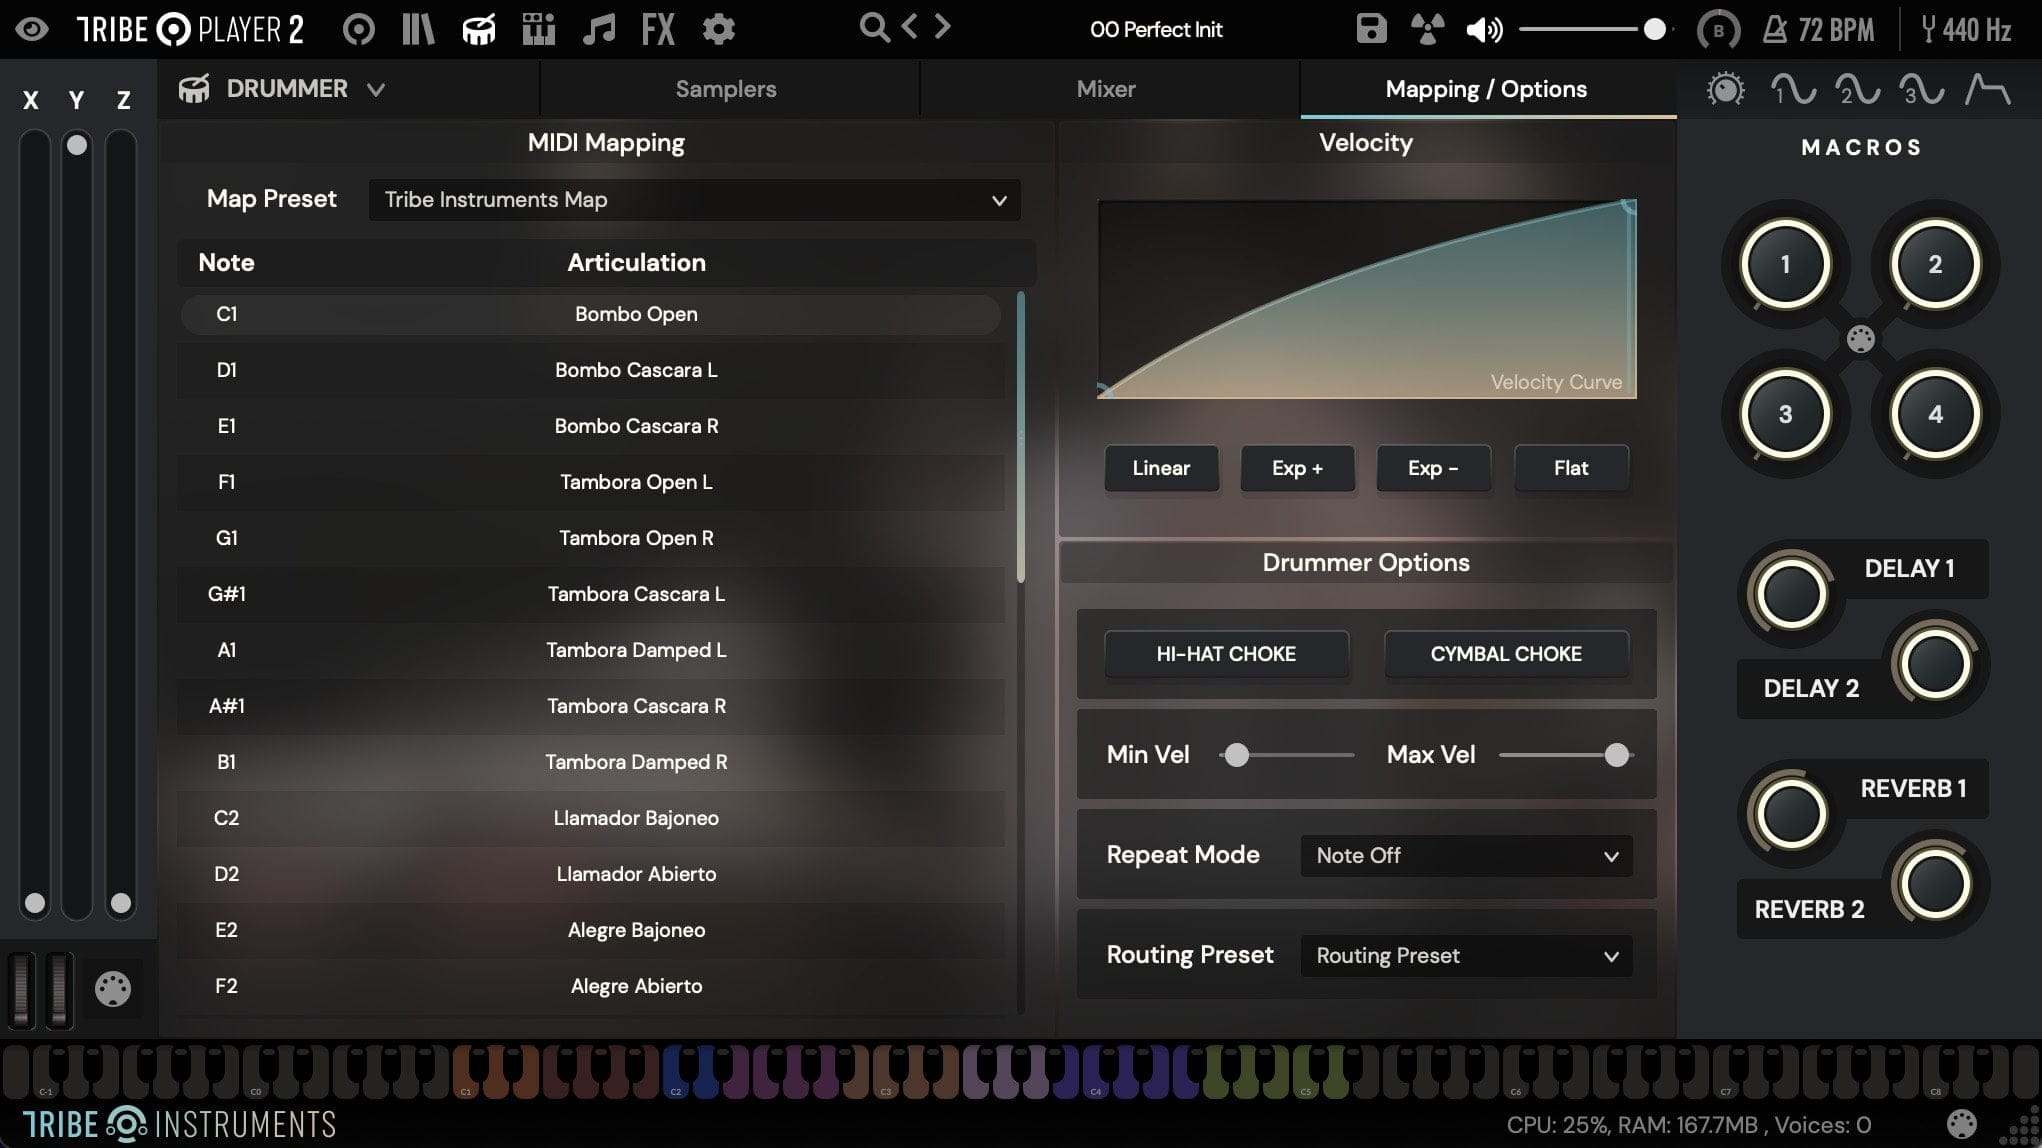
Drummer Mapping / Options
Preview all the Instrument articulations and Map them to different MIDI mapping presets like General MIDI (GM) and other recognised Drummer Software.
You can control the Velocity Curve from a Table with different curve presets like Linear, Exp +, Exp – and Flat to control the dynamics of your performance.
Use different options like Hi-hat and Cymbal Chokes, Min and Max Velocity, Sample Repeat mode and Automatically route every drummer channel to each Player’s output with the Multioutput Routing Preset (Stereo or Multiout).
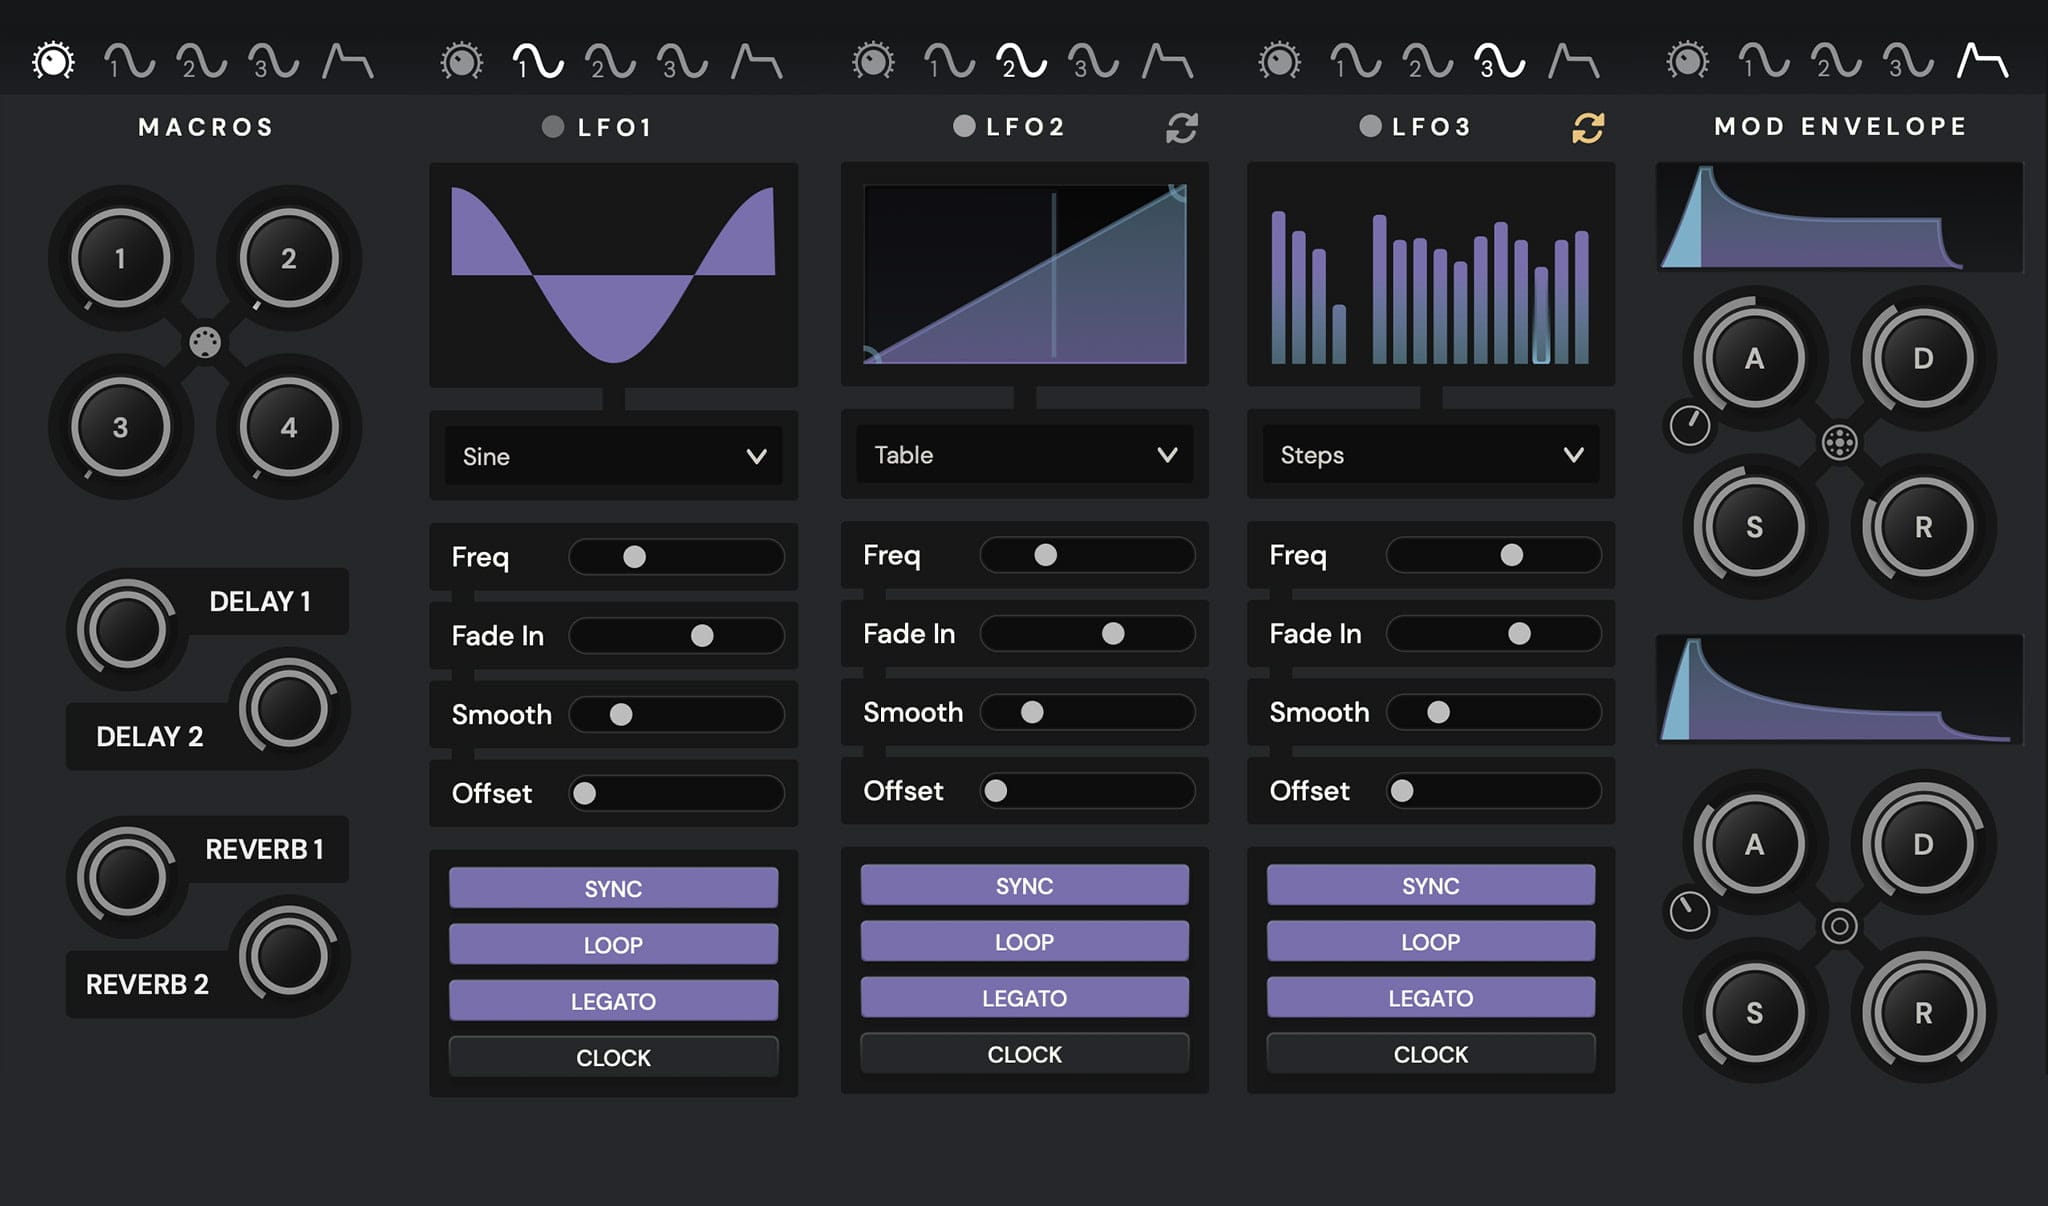
LFO Modulators
Many of the controls in the Tribe Player can be modulated using three LFOs or “Low Frequency Modulators” like in a synthesizer.
You can use different waveforms such as Sinusoidal, Triangular, Sawtooth, Square, Random and even a Table and a Step Sequencer.
(In the Table Left-clicking allows us to create and modify points, while right-clicking deletes them, We can also use right-click to change the curve between each point.)
Control the LFO speed synchronized to the tempo of your project or using Hertz or cycles. We can create a fade-in effect and smooth the interpolation of the LFO. Finally, we can choose whether the LFO remains in a loop or only triggers when we play a note.
Modulation Envelopes
Some Parameters like Filters and pitch can be modulated with two different Envelope Modulators with Attack, Attack Curve, Decay, Sustain and Release Controls, you can also switch between Polyphonic and Monophonic modes with the center Button.
Macros
You can control almost any parameter with four different macros (Like the XYZ Controller) and control this macros with assignable MIDI CC.
You can control some effect global parameters from here too.
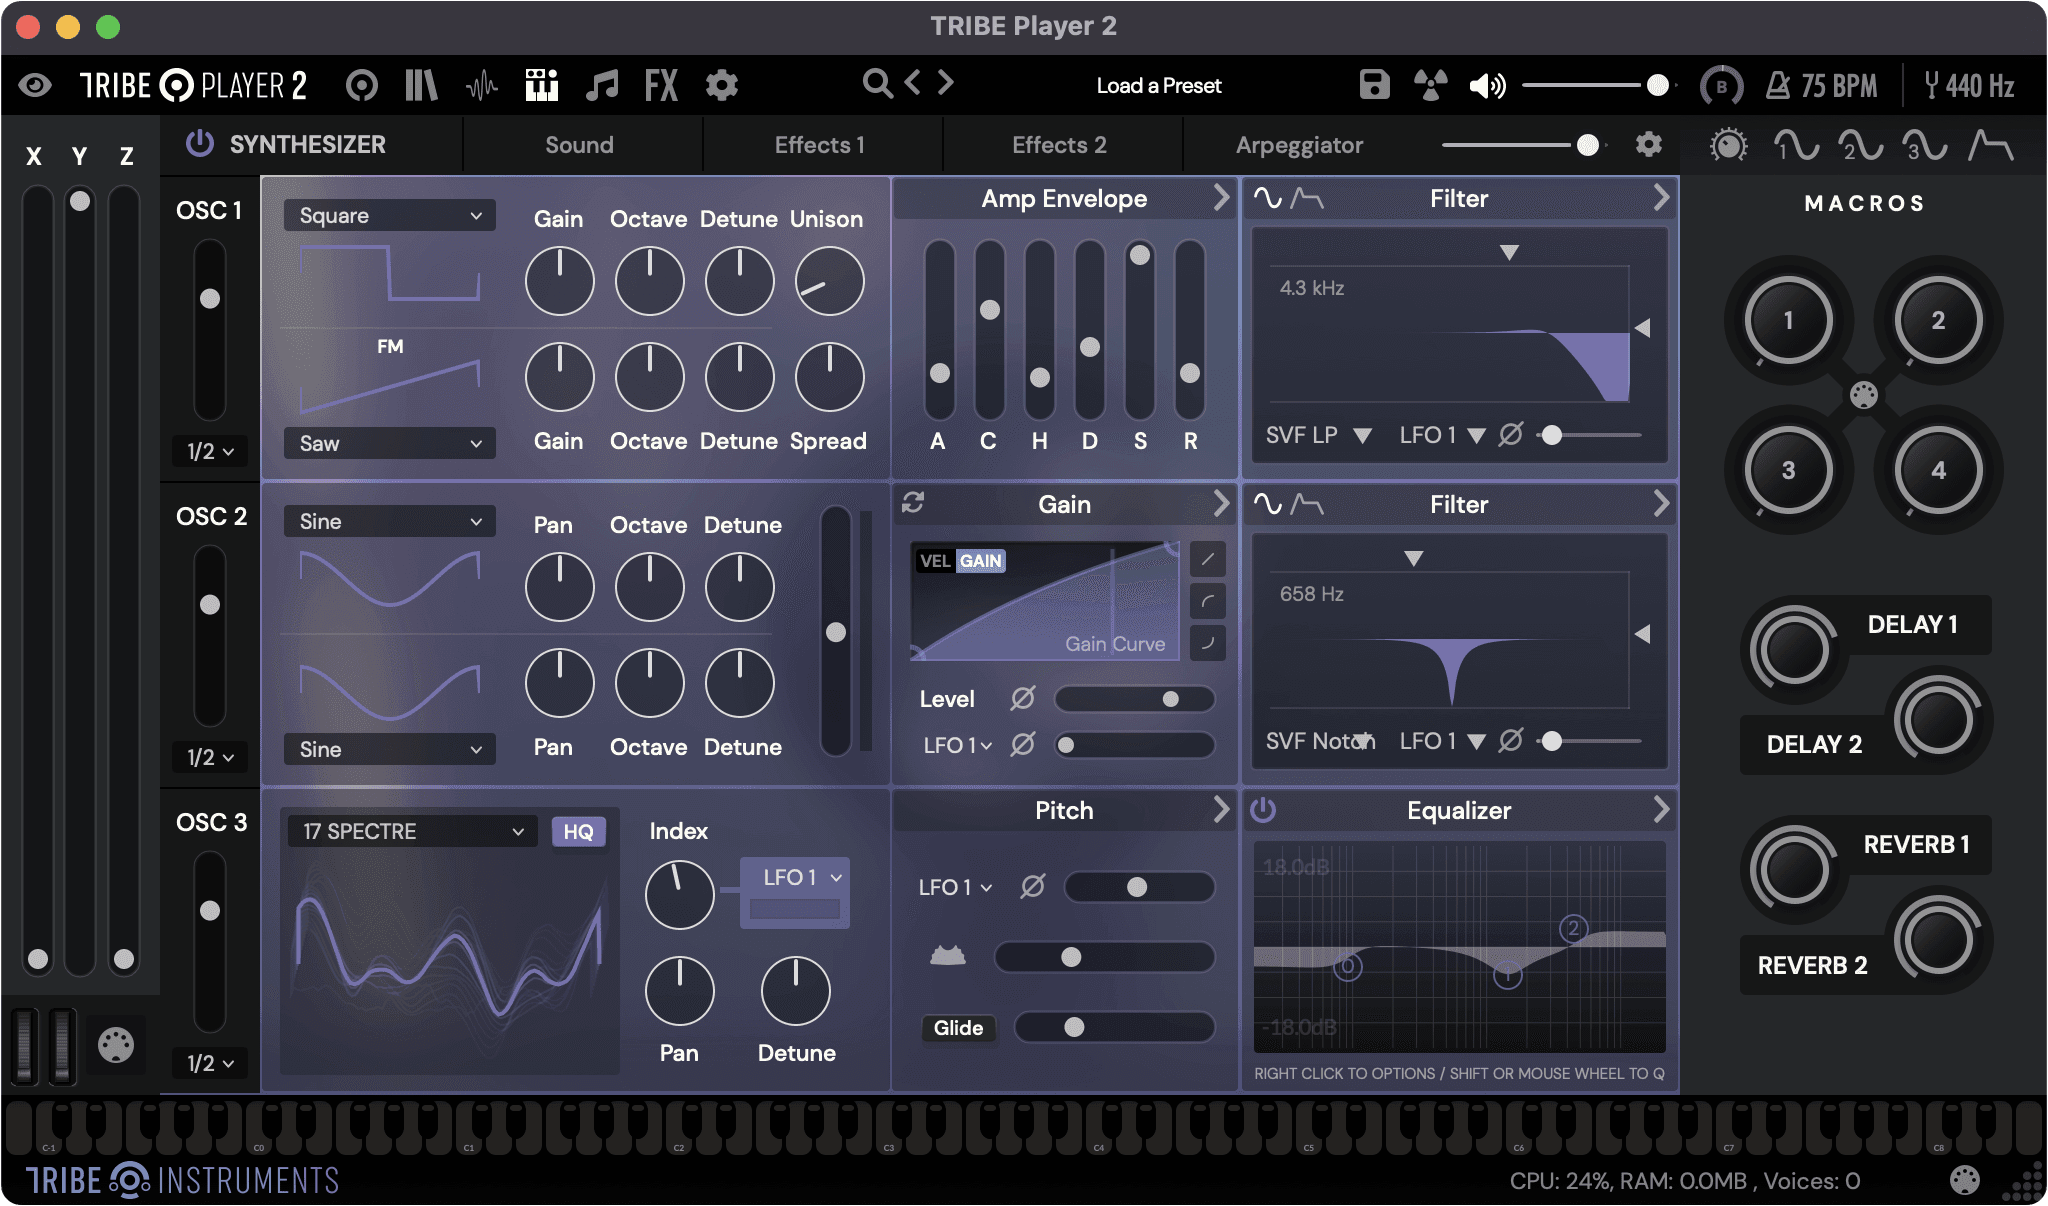
Synthesizer
The Tribe Player 2 integrates a fully hybrid synthesizer (FM, Additive, Substractive and Wavetable) with three different Oscillators and 10 different Waveforms (Sine, Triangle, Saw, Square, Noise, Triangle 2, Square 2, Trapezoidal 1 and Trapezoidal 2) and 23 different Wavetables.
Control different parameters to each Oscillator like Amp Envelope, Pitch, Gain, Filters (LFO and Envelope Modulated), Velocity Curve and EQ.
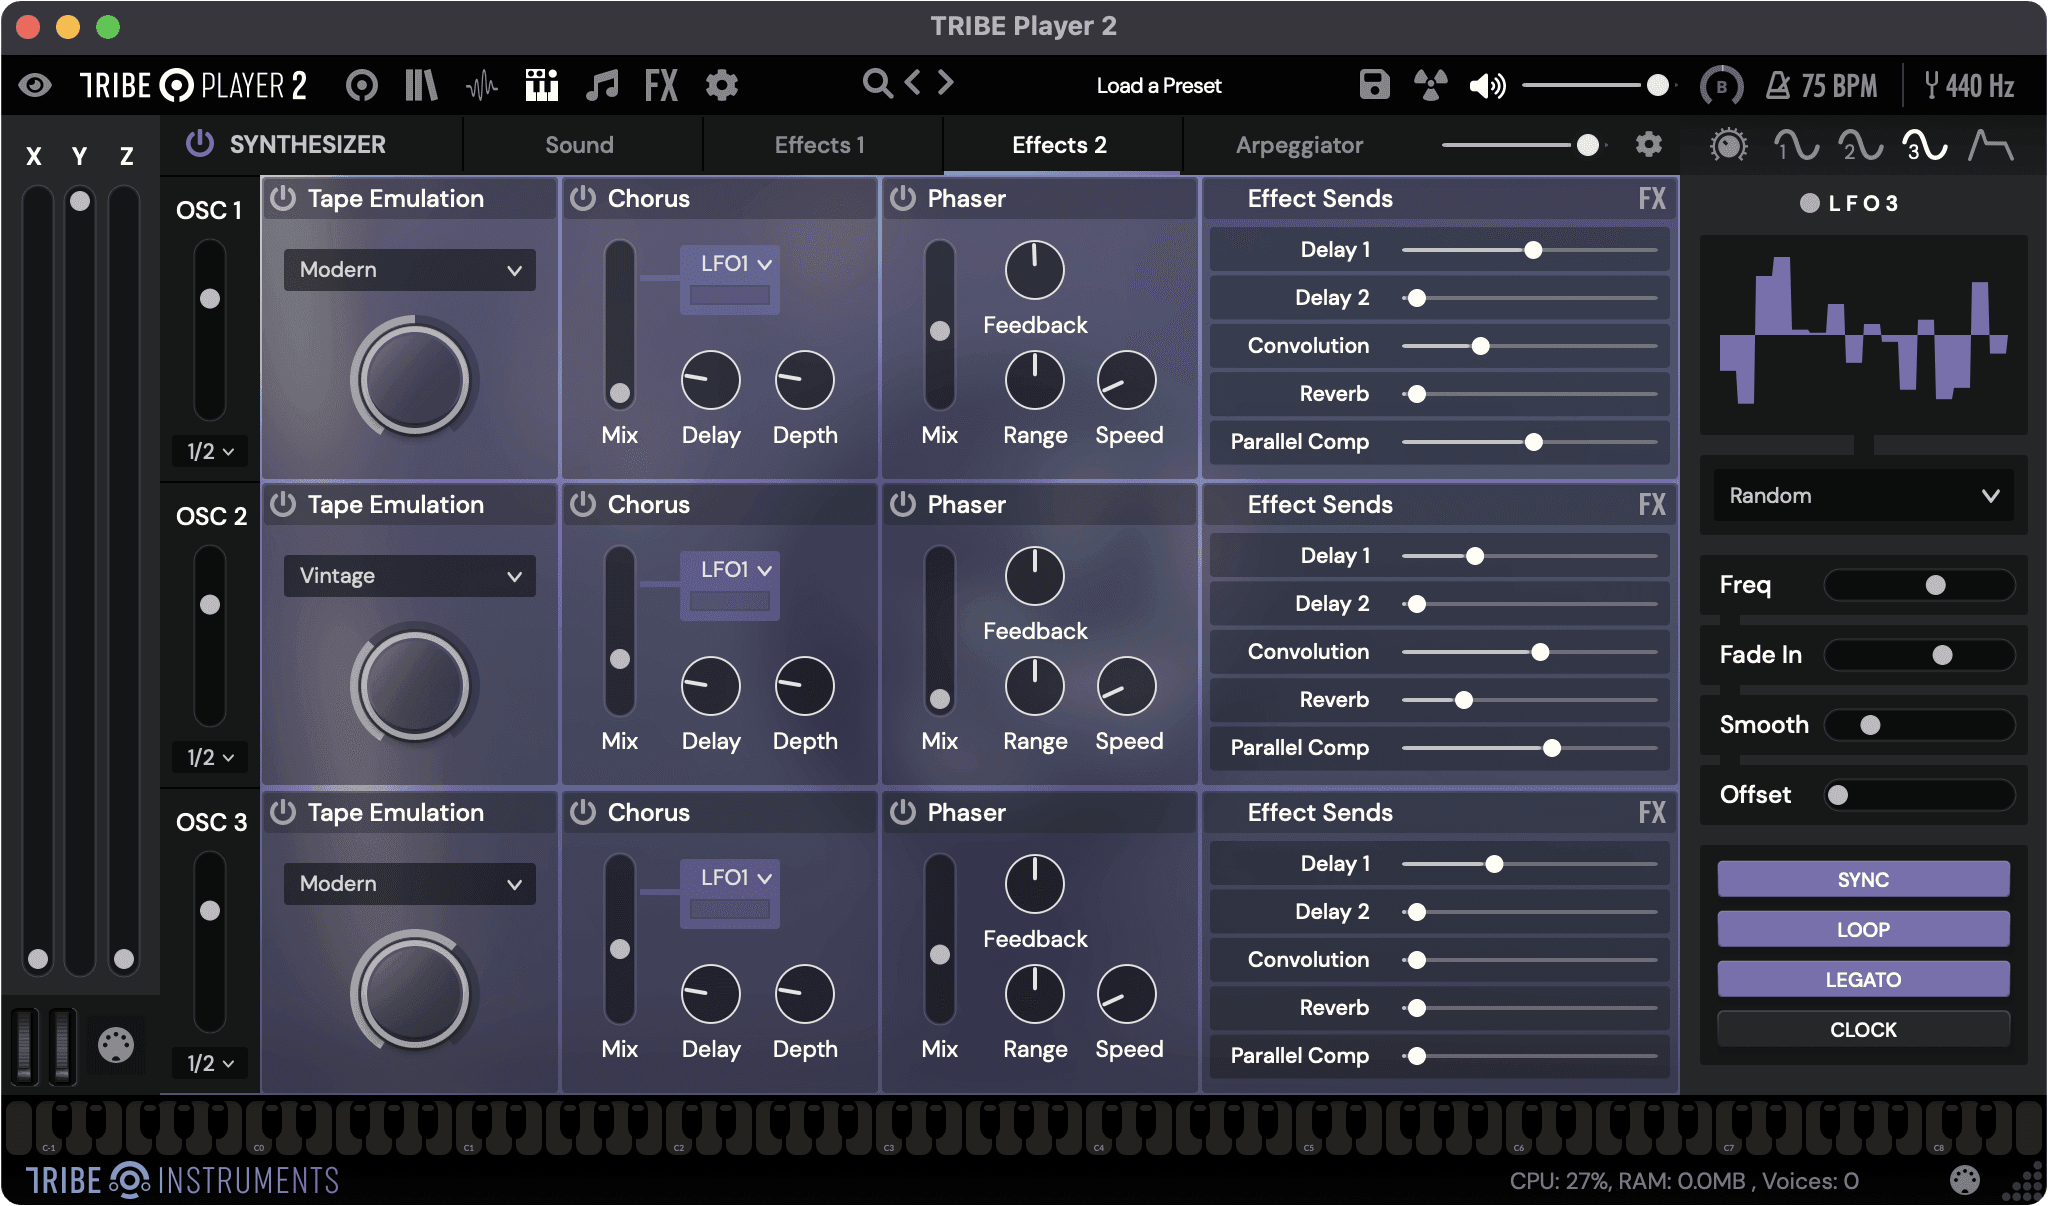
Synthesizer Effects
Process each Oscillator with different DSP Effects like Compressor, Bit Crusher, Distortion, Speaker Emulation, Tape Emulation, Chorus, Phaser and Sends to the Player’s Global Master Effects.

Synthesizer Arpeggiator
Use an advanced Arpeggiator for each Oscillator (The same arpeggiator DSP from the Sampler) to create amazing sounds with different playing modes including Chords with Octave, Speed, Steps (up to 32) and Shuffle controls.
Synthesizer Options
Control different options like the Pulse width of Oscillator 2 and the note range of the overall Synthesiser.
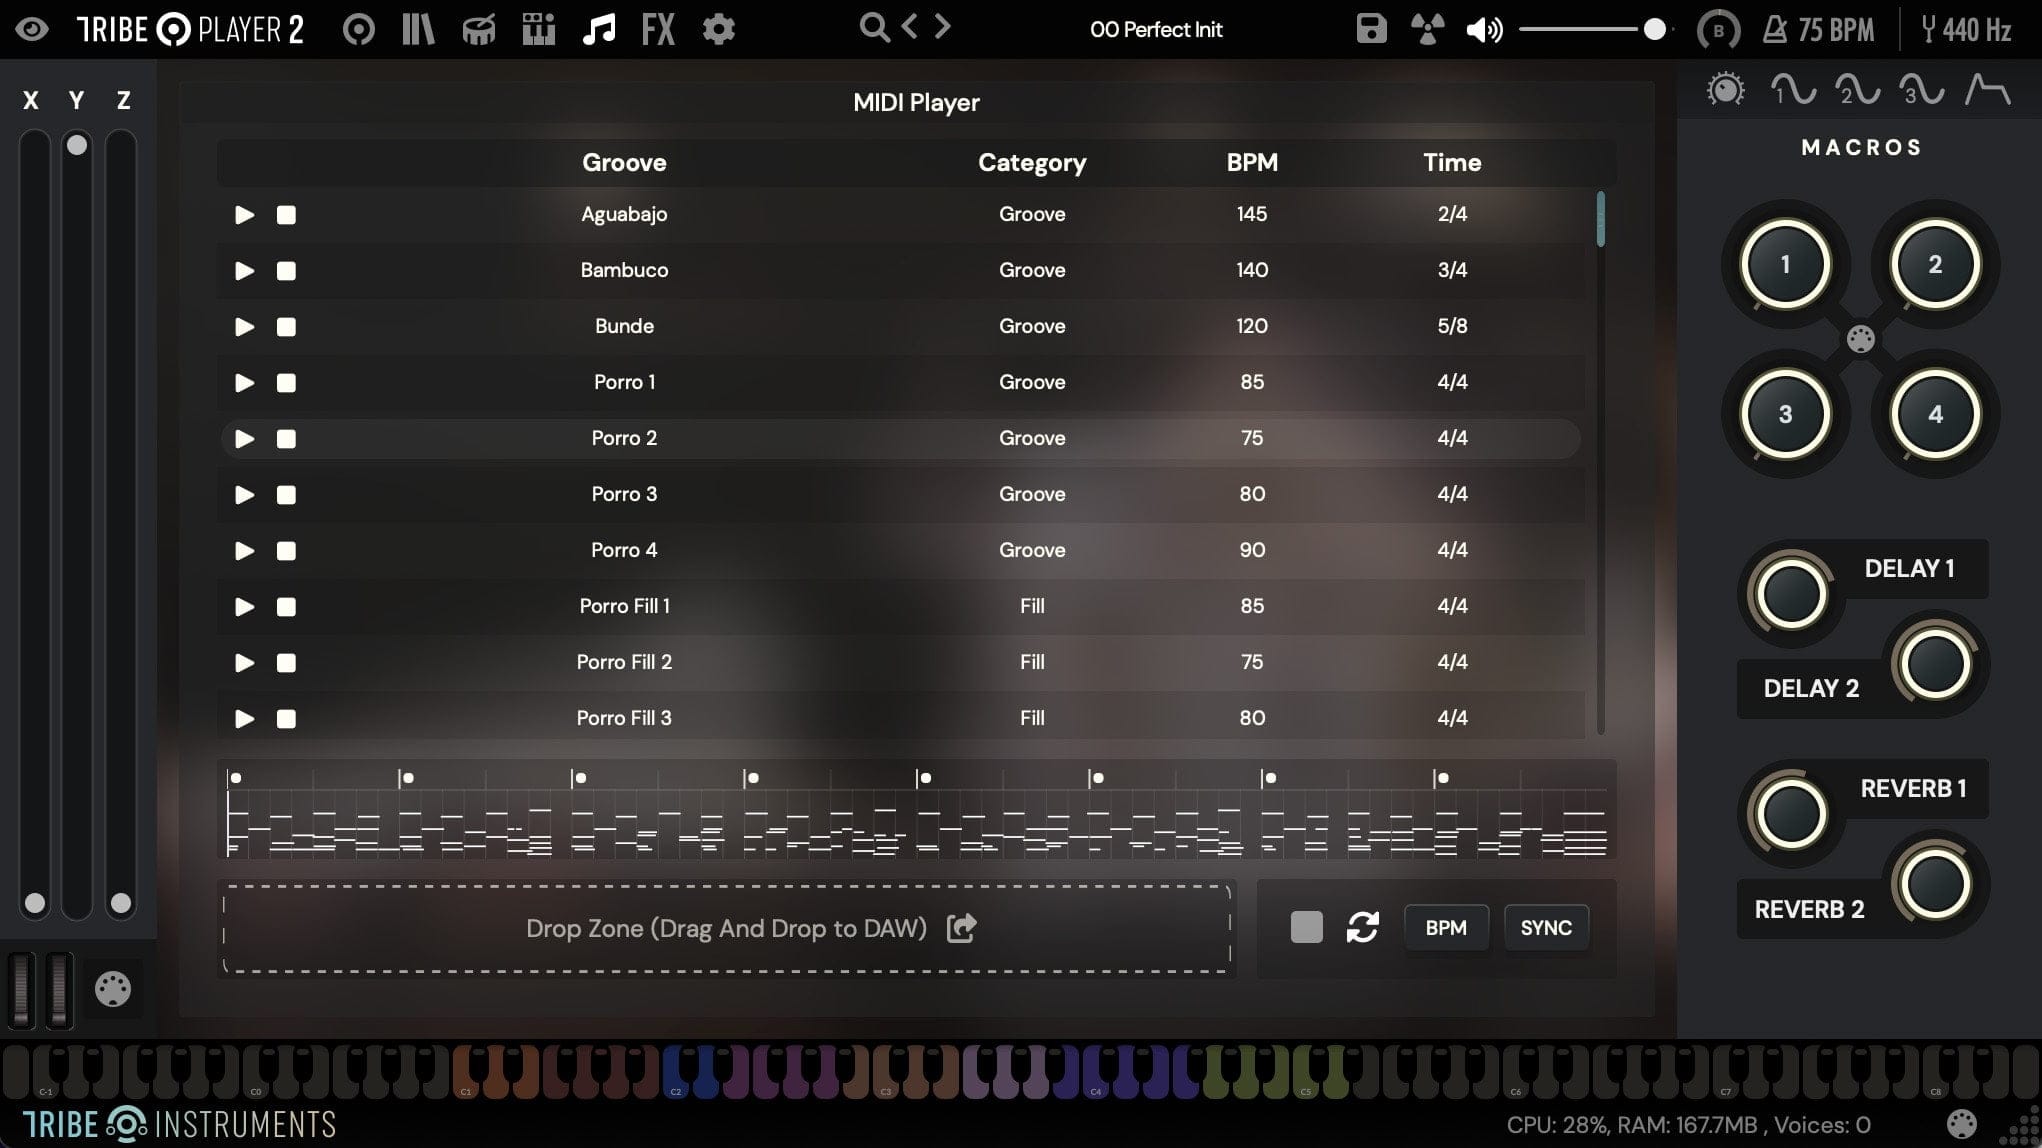
MIDI Player
Some libraries will include a MIDI Groove collection with Drag and Drop function to build Grooves and phrases in your DAW.
Preview the attributes of the MIDI Files like the category (Groove, Fill, Song, Phrase, etc) the original BPM and Time Signature.
You can also activate the loop mode and Sync the Player with your DAW’s Transport and BPM.
MIDI CC Controlled Parameters
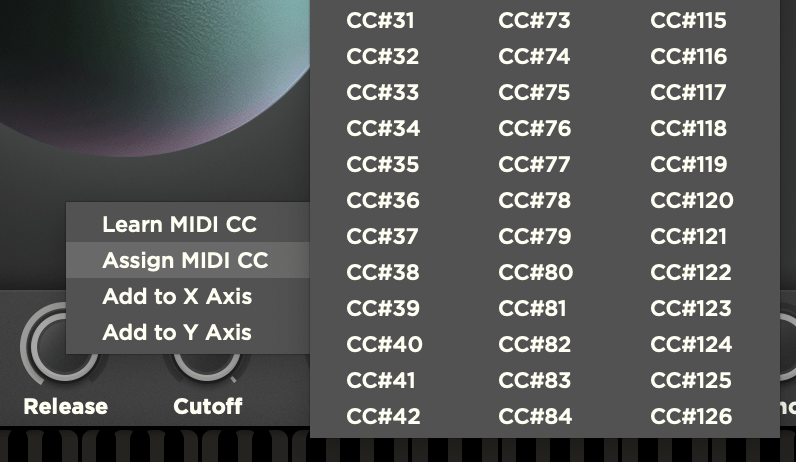
One of the most incredible features of the Tribe Player is its ease of controlling most parameters through MIDI CC or “Control Change” messages. If you have a MIDI controller or a similar application, you can use any message to control any parameter. For example, I can assign the intensity control to the fader on a MIDI controller by right-clicking on the control, selecting “Midi Learn,” or manually selecting the CC number.
Each of these controls can be edited, inverted, and have their range changed. For example, if I don’t want it to go from 0 to 127, which is the maximum range, I can limit the control by changing the value and so on for all the assigned controls. In fact, you can clear the MIDI CC assignments with this button that says “Clear MIDI CC.”